Permalinks: WordPress URL Structure
Permalinks are URL for your blog or website’s posts, pages, categories and tags etc. This will be open by you or any other person to view your blog. Google and other search engine also indexed this URL. So for the SEO purpose it’s really an important factor for your blog.
The default WordPress permalink is hackly. It look like the below URL:
http://yourdoman.com/?p=3
Where “p” denote the unique ID of your post or page. So 3 is your post or page ID. So when we call this through our browser it opens the particular page or post which you have passed through the parameter p.
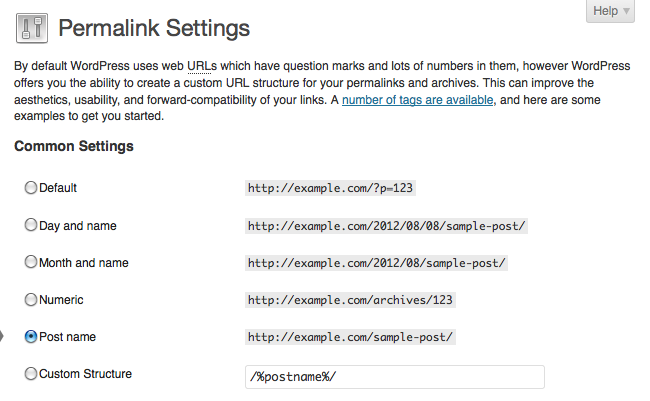
But for the SEO, it’s not a good URL structure. They want good URL structure to attract the user and want URL more user friendly. So doesn’t worry WordPress have also these options and WordPress provides you 6 types of permalinks. You can choose anyone to set for your blog.
Basically WordPress doesn’t create directory structure for your SEO friendly URL Structure. It’s just create a .htaccess file on the root of your blog. So URL is not exists in real on your directory it’s just fake and some magical code through .htaccess file.
To set the permalink no need any programming skill. It’s just some click work in WordPress admin and URL will be set as you want.
Simply go into your Settings > Permalinks area and choose any setting other than the default and click “Save Changes.” If you received the following response message, you are all set:
Permalink structure updated.
If you didn’t get this message then you should create this manually and it’s not a hard work. Just create a file .htaccess on the root of your blog and just paste the below code in that file. It will work.
# BEGIN WordPress


RewriteEngine On

RewriteBase /

RewriteCond %{REQUEST_FILENAME} !-f

RewriteCond %{REQUEST_FILENAME} !-d

RewriteRule . /index.php [L]


# END WordPress
Post Revision in WordPress
Post Revision in WordPress, is really a good option. It stores the every revision of post and we can revert the post to old date. So you should no worry about old content or backup of old content. WordPress allows this and you can do it with simple one click.
default value of Post Revision is true but you can disable this through false.
define( 'WP_POST_REVISIONS', false );
If you want to fix a number of reviosn then you can add number like 3 or 5.
define( 'WP_POST_REVISIONS', 3 );
How to change Upload folder path in WordPress
Sometimes you need to change the uploads folder path or you want to use another folder for this. It’s also a cool solution to stop hacking your WordPress website. It’s Just a one line code for your wp-config.php. Just open and paste the below code for this:
define( 'UPLOADS', '/wp-content/newfolder' );
How to Disable Plugin and Theme editor in WordPress
WordPress Plugin and Theme Editor are real sensitive things in WordPress. So somebody can edit these things from admin panel. So we should not allow to anybody through admin login or user login. To Disable Plugin and Theme editor you will need to paste just below ine in your wp-config.php file. This code will disable the code editing option from admin panel.
define( 'DISALLOW_FILE_EDIT', true );
Why we Optimize and Secure WordPress
Optimization and security for any WordPress blog or website is most important. Google is updating SEO strategy on every month or 6 months. You have a blog or website then you should update your website. You have a blog with lots of good articles but the user is faced with speed and design problem than 20% to 30% user will never return on your website or blog. WordPress offers a good SEO strategy and options for every user.
Optimization:
Your website should optimize in proper way. Optimization means you should work on the following things:
- Website should have optimized css and Javascript. CSS and Javascript should be minifying according to google page speed criteria.
- Image should be optimized and image should have width and height attribute with alt and title attributes.
- Images should be bound in one like search icon, map icon, Social Media icon in one image. So you can use background position for these images.
- Files should be compressed.
- Caching should be enable.
Security:
- WordPress admin url should be change like http://exaxmple.com/myadmin etc. So no one can guess you admin login url.
- Password and user name should be unique.
The most important thing is upgrading your WordPress. You should update your WordPress and Plugin on regular bases.
How to add favicon in WordPress
The favicon is an icon used to represent the website or webpage as shortcut icon or bookmark icon. A website can contain one or more types of favicon. You can use png, JPG images also as a favicon. But the most common type is ico. It’s a small icon with 16*16 PX size. Some website provide an option to create your favicon. You can also create a favicon with .Ico.
There is following code through you can add a favicon to your WordPress website. For this you should follow the below steps:
- Upload favicon in template directory through FTP.
- Open header.php file which exists in your template directory.
- Add below code in header.php and upload header.php again.
<link rel="shortcut icon" href="<?php echo get_stylesheet_directory_uri(); ?>/favicon.ico" />
In case if you have no FTP access then go on Appearance and click on Editor. Click on header.php to open and paste below code and click on “Save changes”.
<link rel="shortcut icon" href="<?php echo get_stylesheet_directory_uri(); ?>/favicon.ico" />
How to use Smileys in WordPress?
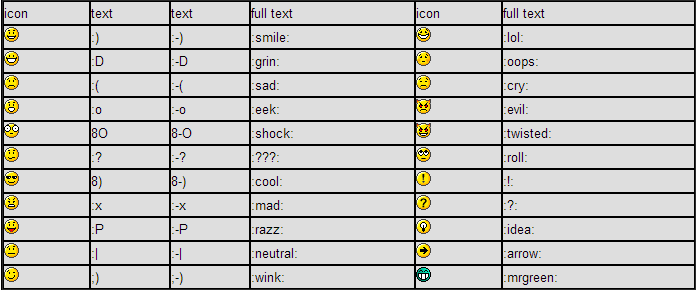
Smileys are digital icon or a sequence of keyboard symbols that represents the facial expression in a web like smiling face :). We also know this as emoticons. At present, we used blogs, websites and chat etc to express our feelings or emotion and every person use smileys to chat. Skype, Facebook etc are using lots of smiles and users use these smileys. WordPress is a CMS which also uses smileys in post, pages and comment. We can add different smileys in Posts, pages and comments with the typing some keys from keyboard. WordPress converts these codes into respective smileys faces.
We can easily turn on or off smileys in WordPress through wp-admin. If you want to turn off the smileys from WordPress and just want to show normal plain text then you should follow the below steps.
- Go to your Admin Panel
- Select Setting > Writing
- In the Formatting section, uncheck the box for “Convert emoticons like 🙂 and 😛 to graphics on display”
Post Format in WordPress
Post Formats is a theme feature introduced with Version 3.1. A Post Format could be a piece of meta info that may be utilized by a subject matter to customise its presentation of a post. The Post Formats feature provides an even list of formats that area unit offered to any or all themes that support the feature. Themes aren’t needed to support each format on the list. New formats can not be introduced by themes or perhaps plugins. The standardization of this list provides each compatibility between various themes associate degreed an avenue for external blogging tools to access this feature during a consistent fashion.
In short, with a subject matter that supports Post Formats, a blogger will amendment however every post appearance by selecting a Post Format from a radio-button list.
- aside – Typically styled without a title. Similar to a Facebook note update.
- gallery – A gallery of images. Post will likely contain a gallery shortcode and will have image attachments.
- link – A link to another site. Themes may wish to use the first <a href=””> tag in the post content as the external link for that post. An alternative approach could be if the post consists only of a URL, then that will be the URL and the title (post_title) will be the name attached to the anchor for it.
- image – A single image. The first <img /> tag in the post could be considered the image. Alternatively, if the post consists only of a URL, that will be the image URL and the title of the post (post_title) will be the title attribute for the image.
- quote – A quotation. Probably will contain a blockquote holding the quote content. Alternatively, the quote may be just the content, with the source/author being the title.
- status – A short status update, similar to a Twitter status update.
- video – A single video. The first <video /> tag or object/embed in the post content could be considered the video. Alternatively, if the post consists only of a URL, that will be the video URL. May also contain the video as an attachment to the post, if video support is enabled on the blog (like via a plugin).
- audio – An audio file. Could be used for Podcasting.
- chat – A chat transcript.
For more information please visit WordPress Website.
Get the term ID on custom category or taxonomy page
WordPress introduce a custom taxonomy in the WordPress 2.3 Version but they start extreme using this from the Version 2.9. Taxonomy is an option to group some posts in one or multiple. Basically WordPress has already provided 3 types taxonomy:
Sometimes we need to create custom post type and then we also add some taxonomy options in that custom post like product is custom post type and product category is custom taxonomy. So we need to create a custom taxonomy template also to achieve our goal.
For this WordPress provides a function get_queried_object().
$queried_object = get_queried_object();

$term_id = $queried_object->term_id;
Uses of get_posts() function in WordPress
WordPress is really a great CMS for current users. WordPress developers use lots of functions and codes to customize WordPress theme and Plugins. Some developers use custom post type of shows testimonial, Products, Services or other things. So they use core functionality WordPress. In this case they use get_posts () function to get the posts of custom post type or blog posts.
We can use this function in any template of WordPress or in any file of WordPress. So it’s not necessary to use this function in any template.
It is useful for the following criteria:
If you want to show all posts then just pass -1 in place of posts number. ‘posts_per_page’ => -1. But through passing any number you can control the posts number in one page.
If you want to get posts according to category then you can use this just passing an array of category id. But if you have not lots of categories and want to show the posts of just one category then just pass the category ID and it will return then posts of that certain category. You can get category ID using taxonomy function in any page or template. If you want to create any template for specific category then please show the Template Structure to create file for any certain category.
Category-slug.php, category-ID.php and category.php are specific files for these.
Orderby and order are 2 argument in thin function. You can set order by value through passing the value of this argument. For random posts you just need to pass rand in orderby.
Order have 2 values DESC and ASC.
If you want to include an specific posts in array then pass array of include posts but if you want to exclude any post then exclude is also exists in get_posts.
Post_type is default post but you can pass any custom post type if you have created.
get_posts() return a set of array according to entered parameters.
For the further information you can check the WordPress tutorial.
$posts_array = get_posts( $args );
 $args = array(

                'posts_per_page'   => 5,

                'offset'           => 0,

                'category'         => '',

                'orderby'          => 'post_date',

                'order'            => 'DESC',

                'include'          => '',

                'exclude'          => '',

                'meta_key'         => '',

                'meta_value'       => '',

                'post_type'        => 'post',

                'post_mime_type'   => '',

                'post_parent'      => '',

                'post_status'      => 'publish',

                'suppress_filters' => true );